4 minute read
What is a LED Digital Display Screen?
LED technology has come a long way since the early 60’s when you could get LEDs in any colour as long as it's red. Digital visual display technology has in recent years become more affordable, surpassing large format data Projector setups. A Digital Display Screen comprises LED’s (Light-emitting diodes) factory assembled into modules at a specified Pixel Pitch (distance between each LED). The closer the pitch the better the image quality showing more detail.
What size Display is right?
LED displays are an incredible way to get noticed for the right reasons and create a visual “wow factor”.
The general rule for LED pixel pitch is for each millimetre the LEDs are apart the distance for viewing should be one metre. For example, a P3 (pixel pitch 3mm) is best viewed at a three-plus metres distance as shown:
|
Pixel Pitch |
Minimum Viewing distance |
Best viewing distance |
|
P3 |
3 metres |
6-8 metres |
|
P6 |
6 metres |
12-18 metres |
|
P10 |
10 metres |
20-30 metres |
Back to size, so what is the best? Well, that’s easy to answer - the bigger the more impact the screen will give to presentations. The larger the screen the better the pixel density. A guide is to keep the correct aspect ratio that means it's best to keep the screen size at 16:9-16:10 so it matches the most common device connected, a laptop. Although an HD Video processor can be included, this uses software to fit the display image correctly if the image ratio is not a common format.
The most common sizes we have fitted are 5x3 metres, 3.5x2 metres and 3x2 metres. These sizes were relevant to the performance space they were fitted into and the number of audiences viewing the image.
What about cost?
That’s the number one question, right? If it’s compared to a full projector, screen and controller set up then it's comparable in cost, considering there are no ongoing costs associated with an LED screen, no brightness issues with ambient light and no lamp replacement/filter cleaning costs.
What about Installation?
This needs to be completed correctly, and crucially, with the correct mounting structure. This means the bracketing system that mounts to the wall or ceiling needs to be engineered to hold the weight and give access to replacement modules if ever required.
It is also advisable that the same run of LED panels that created the display have a few modules spare for replacement of a damaged or faulty module. This will ensure the colour match is perfect.
How do you connect to it?
Once the screen is fitted, it needs to be mapped to display the correct image in the correct panel location. Software is used to correctly map the screen either with an external processor or simple controller depending on the screen aspect ratio.
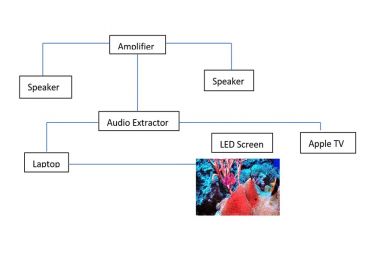
For end-users to display an image on screen simply connect via the provided HDMI lead or connect to an Apple TV or Chrome device for wireless connectivity.
What about sound?
Now there’s an awesome display but no sound. If there is a current audio setup, then the easiest way is to use an audio extractor so only the HDMI supplies the image and sound without messy cables and confusion.
Using the Screen
It’s simple, grab a laptop and connect the HDMI making sure the power to the LED screen and processor is on. Get ready for the “WOW” factor. Play a movie or show a PowerPoint Presentation.
Conclusion
This scalable technology produces a significantly clearer and brighter image than is possible using a projector and is virtually maintenance-free - no more projector filters to clean or lamps to replace. Sitech Systems can design a solution to suit your needs and budget. The only limitations here are your imagination and the space that you have available to fill.


